Working with Illumina Sequence data
16 May 2023Today we begin a series of six labs that all work with the same data set. The data is RNA sequencing data generated from Brassica rapa, a plant with varieties that can be grown for turnips, Napa cabbage, or oil seeds (like canola).
In these labs we will explore how gene expression is influenced by plant variety, growth conditions, and organ type. In this experiment we have:
- Two plant varieties:
- IMB211: a variety with rapid reproduction that has been bred for laboratory work
- R500: an oil-seed variety
- Multiple growth conditions
- growth chamber: simulated sun or shade
- greenhouse: crowded or uncrowded
- field: crowded or uncrowded
- Multiple tissue types
- seedling stem (hypocotyl)
- leaf blade
- leaf petiole
- root
- internode
- inflorescence (young flower stem)
- silique (fruit)
We won’t work with all of these samples through all of the labs, but the final section on genetic networks will make use of most of them.
Over the next several weeks the goals are to:
- Learn about Illumina reads, how to map them, and quality control (today)
- How to view reads in a genome browser and how to find single nucleotide polymorphisms (Thursday)
- Find genes that are differentially expressed between genotypes or treatments (next week)
- Ask if differentially expressed genes have any common functionality (Gene ontologies) or promoter motifs
- Build a gene regulatory network to determine how genes connect to one another (two weeks from now).
Background for today’s lab.
Fastq files
The raw output from an Illumina sequencer is a fastq file. Illumina sequencers generate 350 million sequences of 50 to 250 bp in length per flow-cell “lane”.
Illumina Sequencing
Want more info than was in my lecture?
-
You can read more about the technology at Illumina’s website
-
UCSF Professor Eric Chow has a nice video with lots of background (32 minutes)
-
SDSU Professor Rob Edwards also has a nice video (9 minutes)
Multiplexing
Because each lane on a sequencer generates 350M reads we often want to run more than one sample per lane. This is called multiplexing. After sequencing we want to assign each read to the sample that it originally came from. How? When libraries are made we include a short “barcode” or “index” on each adapter that indicates the library from which it came. We can then read the barcode from each sequence to assign it to a particular sample.
There are two general procedures. In line barcodes are placed at the ends of the adapter, adjacent to the DNA of interest. They are the first bases sequenced and form the beginning of the read. This is the type of barcodes that we have in this data set. In this case the end user (us) must sort the reads according to the barcodes and trim the barcodes off of the DNA sequence.
Index tags are internal in the adapter and are read in a separate, short sequencing reaction. In this case Illumina software will automatically sort the sequence reads for the end-user before delivery. This is the current standard and what you are most likely to encounter other than in today’s lab.
Quality Control
The Illumina sequencer assigns a phred quality score Q to each base of sequence. The quality ranges from 0(low) to 41 (high) and is defined as Q = -10*log10(P) where P is the probability of an error. So a phred score of 40 corresponds to an error probability of 1 in 10,000 ( P = 10^-(Q/10) ) In current Illumina data these are encoded as the ASCII characters “!”=0 to “J”=41, but in previous Illumina data the range was from “@”=0 or “B”=3 to “h”=40 See the fastq wiki for more information.
Mapping
Our overall goals with this sequence data are to
- Find single nucleotide polymorphisms (SNPs) between the two genotypes, R500 and IMB211
- Find genes that are differentially expressed.
In order to do either of these we need to know where in the genome the reads map.
There are a number of read mapping programs available. Two of the more popular ones are bwa and bowtie2. Because we are mapping RNAseq to a genomic reference we want a program that will splice across introns. tophat is a program that uses bowtie2 to map across introns and that is what we will use here. If I am mapping RNAseq to cDNAs or genomic sequence data to a genomic reference I usually use BWA, but both should perform well.
Outline of work
- Check FASTQ quality
- Trim reads to keep high-quality reads
- Split reads based on barcodes
- Map to reference genome
Files
We will work with the following file types today
- .fastq – file of short read data
- .fa – fasta files for reference genome
- .sam – sequence alignment/map file for mapped reads
- .bam – the binary version of a sam file
- .bai – index for bam files
- .gff – genome annotation: information about where the genes are in the genome
The Lab
setup
additional software
There are a few additional packages that need to be installed on your computer for today’s lab.
multiqc
multiqc is a program for aggregating the reports of quality check programs such as fastqc, which we will use to assess our data quality.
Install it from the Linux command line with:
python3 -m pip install numpy --upgrade # Ubuntu's default numpy installation is out of date and is required for multiqc
python3 -m pip install zipp --upgrade # Ubuntu's default zipp installation is out of date and is required for multiqc
python3 -m pip install multiqc # In most cases you can just do pip3 install multiqc
sudo ln -s ~/.local/bin/multiqc /usr/local/bin/multiqc
Trimmomatic
Use the commands below to download Trimmomatic, a program to filter reads based on quality scores and other criteria. You can use the wget command (below) to download directly, or if you download from your browser, be sure to click on the “binary” version.
From the Linux command line:
cd ~/Downloads
wget http://www.usadellab.org/cms/uploads/supplementary/Trimmomatic/Trimmomatic-0.39.zip
unzip Trimmomatic-0.39.zip
Next move that folder into the /usr/local/bin directory, a common place for user installed programs.
sudo mv Trimmomatic-0.39 /usr/local/bin
The trimmomatic program itself is written in java. We use a bash alias to make it easier to start. We will place the alias in the file ~/.bashrc; this is a bash script that is run every time bash starts.
Use nano to open your ~/.bashrc file. (Note that the file is hidden because it starts with a .. To see it at the command line use ls -a). If the file appears empty when you opened it you made a mistake.
cd
ls -a
nano .bashrc
After you have the file open then paste the following lines to the end of it and save the file.
# alias to run trimmomatic
alias trimmomatic="java -jar /usr/local/bin/Trimmomatic-0.39/trimmomatic-0.39.jar"
Finally source your .bashrc file to set the alias for this session. You won’t need to do this again.
source .bashrc
You can test whether this works by typing trimmomatic at the command line. You should get a short usage statement. If you get a command not found error, then something went wrong.
auto_barcode
auto_barcode is a program for splitting fastq reads based on their barcode, written by Mike Covington, a bioinformaticist formerly in the Maloof Lab (and now running his own company, Amaryllis Nucleics ) which was acquired by Active Motif Incorporated last year.
auto_barcode is written in Perl and we need to install a few Perl modules before we install autobarcode. To do this we use cpan which is a module installer for Perl.
First step is to update cpan
cpan install CPAN
cpan will ask you a couple of questions, first whether you want it to autoconfigure. Press the return key at the prompt to accept the default yes
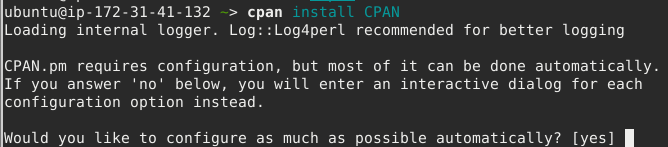
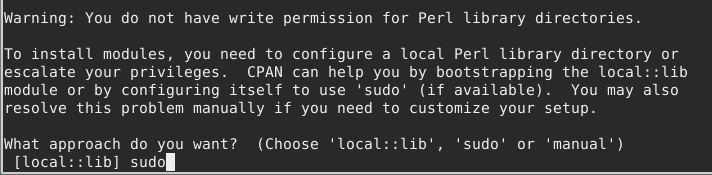
Next it will ask you about privileges. Here you should type sudo
Next install the required module:
sudo cpan install Text::Levenshtein::XS
Press the return key at the prompt to accept the default yes for autoconfigure
Now we are now able to install auto_barcode
You can cut-and-paste(!) the commands below into your terminal to install auto_barcode.
First we clone the repo:
cd /usr/local/bin
sudo git clone https://github.com/mfcovington/auto_barcode.git
When you type a command on the command line, the shell only looks in certain directories to find the requested program. We need to either modify the PATH variable to include the path to our new program, or make a symbolic link to place it in a directory already in the path. We will choose the later option here:
sudo ln -s /usr/local/bin/auto_barcode/barcode_split_trim.pl /usr/local/bin/barcode_split_trim.pl
test it:
barcode_split_trim.pl
That should produce a usage statement. If you got an error saying command not found then something went wrong.
Data
- Clone your Assignment_8 repository.
- Change directories into the Assignment_8 directory.
- Now change directories into the
input/Brapa_referencedirectory.
Download and unzip the Brassica rapa fasta reference file:
wget https://bis180ldata.s3.amazonaws.com/downloads/Illumina_Assignment/BrapaV1.5_chrom_only.fa.gz
gunzip BrapaV1.5_chrom_only.fa.gz
Download the Brassica rapa gff reference file:
wget https://bis180ldata.s3.amazonaws.com/downloads/Illumina_Assignment/Brapa_gene_v1.5.gff.gz
gunzip Brapa_gene_v1.5.gff.gz
Change directories to the input/Brapa_fastq directory
Download the fastq file
wget https://bis180ldata.s3.amazonaws.com/downloads/Illumina_Assignment/GH.lane67.fastq.gz
Note: I have placed these filenames in the .gitignore file for this repository so they will not be uploaded to github; they are too big
Index the B. rapa genome
bowtie2 will needs a memory-efficient index of the reference genome file. We create that with the command below. It takes about 6 minutes to run. While it is running you can continue on to “Check sequence quality”, below.
The first argument is the filename of the reference (fasta) file. The second argument is the filename “stem” for the resulting index.
Change directories back to the input/Brapa_reference directory, then:
bowtie2-build --threads 3 BrapaV1.5_chrom_only.fa BrapaV1.5_chrom_only
# this takes about 6 minutes to run
While the above command is running you can go ahead and work on exercises 1-5
Checkout the fastq file
Take a look at the fastq file
Exercise 1:
a What is the read length? (can you do this without manually counting?)
b What is the machine name?
c How may reads are in this file? (show how you figured this out)
d Are the quality scores Phred+33 or Phred+64? (how did you figure this out?)
Check sequence quality
We want to know if our reads have good sequence quality and to check for other possible errors in the sequence data. Type fastqc at the command line. This will open up a GUI. Point it to your fastq or fastq.gz file and have it check the quality. (It is also possible to run fastqc entirely from the command line if you are processing many fastq files).
Exercise 2: Compare your fastq results to the examples of good sequence and bad sequence on the fastqc website. Comment on any FastQC items that have an “X” by them in the report. What might have caused these issues? (hint: think about barcodes).
Filter reads
It is generally a good idea to trim reads when their quality drops below 20 or so. We will use trimmomatic.
Exercise 3: Take a look at the trimmomatic web page and user manual and figure out how to modify the command below to clip after the average read quality across 4 bases drops to 20 or less. AND only retain reads where the trimmed length is 50bp or more.
Modify and then run this command
trimmomatic SE GH.lane67.fastq.gz GH.lane67.trimmed.fastq SLIDINGWINDOW:5:15 MINLEN:70
a What trimmomatic command did you use?
b How many reads were removed by trimming?
c Trimmomatic has the option to remove Illumina adapters. Why did we not do that here? hint: look at the fastqc output
d rerun FastQC on the trimmed sequences. Which issues did the trimming fix?
(If you want a good challenge you can try to figure out how many reads had some basepairs trimmed but were retained…)
Barcode Splitting
The fastq file contains reads from many different samples, indexed with a 5’ barcode on each read. We need to split the reads according to the barcode and then remove the barcode from the 5’ end.
Exercise 4: Look at the README for auto_barcode and figure out how to run it to split your samples. Specify that the split fastq files are placed in the directory split_fq. Use the Perl (.pl) version of the script
hint: at the bottom of the README are three examples of how to run the command. The second one is pretty close to what you need
a what command did you use?
b what percentage of reads did not match a barcode? What are possible explanations?
check quality of each sequence library
Now that we have split the sequences by barcode we can check the quality of each library individually.
To do this we will first run fastqc in command line mode and then run multiqc to aggregate the results.
The code below assumes that you are in your Assignment_08/input/Brapa_fastq directory. cd there if you are not.
mkdir ../../output/fastqc_out
fastqc --threads 3 -o ../../output/fastqc_out split_fq/*.fq

cd ../../output
multiqc fastqc_out
You may need to change the paths above.
Now look at the report. You can have Firefox open the html from the command line:
firefox multiqc_report.html
Exercise 5:
a: What library has the worst quality based on the Sequence Quality Histograms? Is it bad enough to concern you?
b: Click on each of the other tests. Which three libraries are most problematic? In which tests?
c: Do you think the libraries should be removed from downstream analysis?
Mapping
If we identified serious problems from multiqc we would probably want to do some additional filtering or remove those libraries. But for now we will just proceed with all the libraries.
Now map/align the sequences to the indexed reference. We will use tophat, which in turn calls bowtie2. tophat handles the splice junctions whereas bowtie2 actually maps the fastq sequences to the genome. Note that there are many options that could be specified (See bowtie2 -h and tophat -h).
Change directories back to the Assignment_08 directory
A single fastq file could be mapped using:
tophat --phred64-quals -p 4 input/Brapa_reference/BrapaV1.5_chrom_only input/Brapa_fastq/split_fq/IMB211_DP_1_SILIQUE.fq
Where the first path give the location of the bowtie index (built before Exercise 1) and the second path gives the location of the fastq file that you want to map.
Exercise 6: using a bash for loop run tophat on all of the fastq files. Show your code here. Make sure that the results are going somewhere in your output directory. Also: IMPORTANT By default tophat will write to directory “tophat_out”. If you run it multiple times it will overwrite the contents of this directory each time. Therefore be sure to read the tophat help file so that you can figure out how to have your for loop write to a new directory for each fastq file!
IMPORTANT 2 This will probably take about an hour to run. You can leave your instance on but do not need to stay in lab while it runs.